Products
Solutions
Resources
9977 N 90th Street, Suite 250 Scottsdale, AZ 85258 | 1-800-637-7496
© 2024 InEight, Inc. All Rights Reserved | Privacy Statement | Terms of Service | Cookie Policy | Do not sell/share my information

Each PCO and CCO is unique and might require various levels of approval for the PCO, CCO, or supporting documents. The Workflow Assignments tab lets you to set up the proper approval steps. Workflow approvals are assigned at the organization, project, and PCO or CCO levels to allow for maximum flexibility in the approval workflow.
Workflows configured at the organization or project level are based on value thresholds. The thresholds are absolute values. When the change order reaches a value above or below the specified threshold, a user or role must approve the change order before it can advance. For example, if the threshold is $1000, a change of $1000 or -$1000 or more starts the workflow.
You can configure approval workflows for any PCO or CCO. These approval steps are first in the approval workflow. If the difference in value of the PCO or CCO is greater than absolute value workflow thresholds set at the organization or project levels, the approval steps are shown on the page. They are marked with the information icon. Any steps you add are performed before those set at the organization and project levels. When the value of the PCO or CCO is within the absolute value thresholds or if no thresholds have been set, only the steps at the PCO or CCO level are performed.
A PCO does not need to be fully approved before converting it to a CCO. When you convert a PCO that has not been fully approved to a CCO, the PCO approval status is shown in the new Approval status field in the Associations section of the CCO details. You must complete all of the PCO approval steps before you can start the CCO approval workflow. The CCO must be approved, if required, before it can be submitted for execution.
Set up an approval workflow for a PCO or CCO when the change order requires approval by various levels of your organization before it can advance.
Steps set at the PCO or CCO level are performed before those set at the project and organization levels, respectively. If the value difference of the PCO is greater than the absolute value thresholds, the steps are shown on the Workflow approvals page, and you cannot rearrange or delete them.
On the record page for a PCO or CCO, select the Workflow Assignments tab.
Click the Add approval icon. The Add approval slide-out panel opens.
Enter an approval step title, and then specify the users, groups, or roles who must give their approval.
Click Add.
Repeast steps 3 and 4 until all approval steps are added. You can use the up and down arrows to change the order of the steps you added, if necessary. Click Save after rearranging the approval steps.
When the change order is ready to advance, you can start the approval workflow.
Start the approval process when the PCO or CCO is complete and you are ready to advance to the next stage.
Go to the Details page for the PCO or CCO, and then click Save and start approval. The Start approval dialog box opens to the approval steps page.
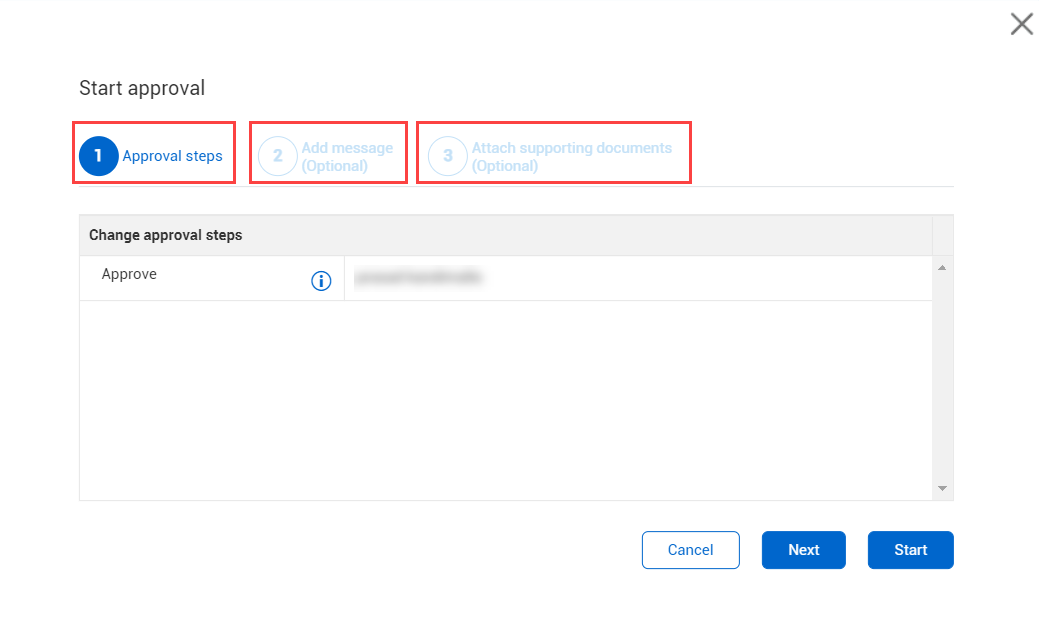
Review the change approval steps.
Choose one of the following:
If you do not want to add a message and attach supporting documents, click Start. The approval process starts.
If you want to add a message or attach supporting documents, click Next. The Add messages page opens.
Choose one of the following;
If you want to add a message to be included in the workflow email, type and format it, and then click Next. The Attach supporting documents page opens.
If you do not want to add a message, click Next. The Attach supporting documents page opens.
Choose one of the following:
If you want to attach supporting documents, click Next. The Attach supporting documents page opens.
If you do not want to attach supporting documents, click Start. The approval process starts.
Select one or more supporting documents from the list of documents.
Click Start. The approval process starts.
The approvers receive a notification of the approval item. When you start the approval process and you are the first approver in the approval workflow, the first step of the workflow is automatically approved, and the workflow continues with the next step, if applicable. If you are the only step in the approval, you receive a second email confirming the new issue has been approved.
Document approval workflows are based on document type. Document approval workflows are set up at the organization and project levels. At the change order level, you can set up additional document approvals on the Document approval page of the Workflow assignments tab.
Set up a document approval workflow when a document associated with change order requires approval by various levels of your organization before it can advance.
Approval steps might have been set at the organization or project levels. You cannot rearrange or delete the approval steps; you can add steps that are performed before those set at the project and organization levels.
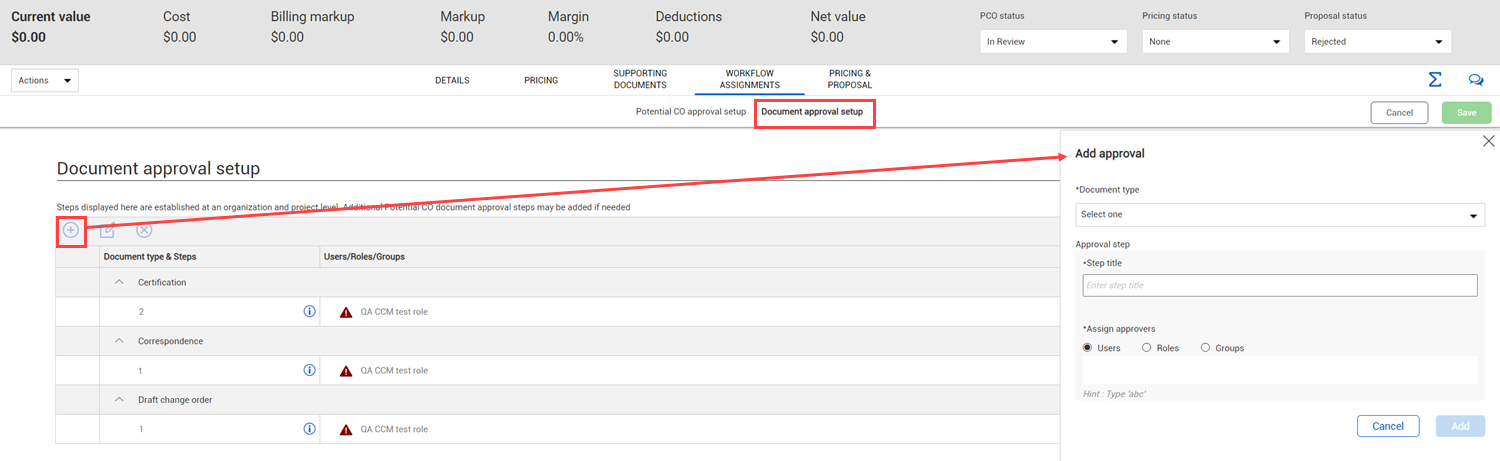
On the record page for a PCO or CCO, select the Workflow Assignments tab, and then select the Document approval setup tab.
Click the Add approval icon. The Add approval slide-out panel opens.
Select a document type. If there are already approval steps for a document type, it is not shown in the drop-down list.
You can add steps to an existing approval by canceling this set up and then clicking Add another step for the document type.
Enter an approval step title, and then specify the users, groups, or roles who must give their approval.
Click Add.
Repeat steps 2 - 4 until all approval steps are added. You can use the up and down arrows to change the order of the steps you added, if necessary. Click Save after rearranging the approval steps.
When the change order is ready to advance, you can start the approval workflow.
Start the approval process when the document is complete, and you are ready to advance to the next stage.
Go to the Supporting documents page for the PCO or CCO, and then select one or more documents.
Click Start approval. The Start approval dialog box opens. The Start approval dialog box shows all the steps in the approval workflow for each document selected.
Review the change approval steps for each document. If there are group steps, you can select the group for the workflow. If you want to make changes to the approval process, click Cancel, and then go to the Workflow Assignments tab to make your changes. If the steps do not require changes, click Start. The Start approval dialog box stays open until all workflows have successfully started.
If you are an approver, you receive a notification of the approval item. Each approval workflow generates its own mail notification to the first approver. When you start the approval process and you are the first approver in the approval workflow, the first step of the workflow is automatically approved, and workflow continues with the next step, if applicable. If you are the only step in the approval, you receive a second email confirming the new issue has been approved.
When the document is in approval, you can change the supporting document title or add or change notes and other metadata. You cannot change the document type or the file link. If you want to change the file link or the document type, you must recall the document from the approval, make the changes, and then start the approval again.
You can view document approval workflow progress and history on the project Workflows > Workflow details page. If the workflow has been recalled, the name of the person who recalled the workflow is shown in the workflow heading.
Additional Information
9977 N 90th Street, Suite 250 Scottsdale, AZ 85258 | 1-800-637-7496
© 2024 InEight, Inc. All Rights Reserved | Privacy Statement | Terms of Service | Cookie Policy | Do not sell/share my information